
Ola Smalley, Chapter Leader at St Mary Magdalen, Wandsworth, writes: A couple of weeks ago, I was asked to repair an ombrellino, a ceremonial processional parasol used in Catholic liturgy. This wasn’t my first time working on one, but this particular ombrellino arrived in much worse condition than the previous one: the top fabric was badly damaged, the pole had been awkwardly repaired with a chunk of metal, and the overall look was far from fitting for the solemnity of Corpus Christi. I set myself 14 days to bring it back to life.

Here’s how it went, step by step, from sourcing materials in Rome to the final stitch on the tassel fringe.

Day 1: Getting Started and Gathering Materials
The top fabric was beyond saving, so full replacement was necessary. Luckily, I was able to source a beautiful white damask fabric from Barbiconi in Rome, and a rich gold braid from Gammarelli, both renowned ecclesiastical fabric suppliers.
Choosing fabric is interesting when working with old vestments. You’ll rarely find an exact match, so you need something similar in pattern and tone. I opted for a floral damask that felt suitably traditional and ornate, paired with a more elaborate braid than the original. By the end I decided to keep the original braid as it was much more beautiful and still useable, but braid shopping was great fun!
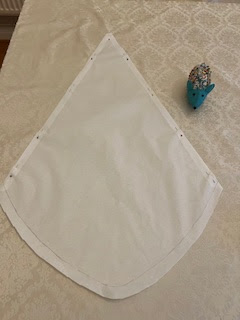
Day 2: Design Decisions and Pattern Drafting
Most ombrellinos are made from eight triangular(ish) segments stitched into a circle. This one, however, had a single circular piece on top. I decided to go with the traditional eight-segment design, given that my fabric had a repeating pattern that would look odd as one piece only.
With that in mind, I carefully measured the original parasol and drafted the pattern in my sketchbook with according measurements. I added plenty of “reserve” fabric in case something went wrong (which it often does!). I then transferred the pattern onto tracing paper.
Days 3–4: Reworking the Pattern and Cutting Fabric
After a second look, I revised the pattern entirely to avoid complications later. It's tedious work, but it pays off. There was tracing paper everywhere, but if you get this wrong part wrong, the final product will not work.
Cutting the damask took time and precision. I spent ages identifying the “right side” of the fabric and made sure the pattern aligned for all eight segments. I pinned everything before making a single cut. It’s better to spend time now than waste fabric later.

Day 5: Pattern Matching and Initial Assembly
I dry-fitted the pieces on the ombrellino frame to get a sense of tightness and drape. If the fabric is too tight, it stresses the mechanism. Too loose, and it sags. Once I was satisfied, I started pinning two segments at a time (on the right side of the fabric; again, damask tricks the eye, and I did have to unpick one piece as the fabric wasn’t the right way up!). I used a slip stitch to sew them, constantly checking that the pattern aligned perfectly. After each pair, I checked the fit on the mechanism, trimmed the excess, and ironed the seams. Eventually, I joined all eight segments to form the complete top, leaving only one undone.

Days 6–7: Removing the Old Trim
Next came the slow but crucial task of removing the original braid and fringe from the original top fabric. This part can't be rushed; damaging the braid or the fringe would mean that I wasn’t able to reuse them, and there is something beautiful about preserving the original parts.

Days 8–9: Sewing on the New Braid
I stitched the braid on to each of the eight pieces using stab stitch so that the thread stayed hidden beneath the surface. I pinned, tacked, and stitched each section, leaving the ends open to complete once the circle was fully assembled. Each piece took about 40 minutes to sew on. The Guild of St Clare’s website has a great tutorial video if you have never sewn on a braid before!
Day 10: Attaching the Canopy to the Frame
Before attaching the top to the frame, I finished sewing the final connecting edges of the circle. I then carefully pulled the canopy over the mechanism and adjusted the top opening to fit well without strain. To keep the fabric in place during use, I made elastic loops and stitched them to the eight stretchers of the mechanism.
Day 11: Joining the Lining
This part was surprisingly smooth. I reused the original lining, which still held its fold lines. With the frame opened I firstly attached the top fabric and the lining together using the herringbone stitch going all the way underneath the length of the braid. With the frame opened, I pinned, ironed and hand-sewed it to the new top using a slip stitch.
.jpeg)
Days 12–14: Tackling the Tassel Fringe
Sewing on the fringe was the most nerve-wracking part. I'd never done it before, so I experimented with techniques for a couple of hours. Eventually, I settled on a backstitch that only went through the top fabric to keep the lining looking clean.
Mistake alert: I initially pinned only two sides of the fringe. Midway through, I realised I was going to run out of trim and had to unpick five sides.
Painful lesson: always pin the full circle before stitching to make sure you allocate enough trim to each side.
After re-pinning everything, I stitched the fringe on, side by side, following the fabric pattern. Each side took about an hour to complete.

The Final Result
After 14 days (and about 50 hours of work), the ombrellino was restored.
This project reminded me how much care, patience, and precision go into restoring traditional liturgical items.

If you are thinking of restoring an ombrellino, here are a few quick tips:
- Measure three (or in my case 20) times, cut once.
- Match patterns with intention. It takes longer, but makes a huge difference.
- Test everything before sewing. Dry fits, pinning, and even mockups save time.
- Respect the tradition. The object serves a higher purpose; make sure your craftsmanship reflects that. If you need to unpick something to make it look better - do, it’s about the final result and it is never a waste of time.

.jpg)
No comments:
Post a Comment
Note: only a member of this blog may post a comment.